DC Blog

Tuesday, 25 January 2011

We're not changing from Giggly to Cautious! (My Illustrator Tutorial)

Hello Everyone, The Badger is back! This time with a Tutorial on how to make Glossy Buttons in Adobe Illustrator. This is what is should look like once you have finished:


Lets get started:

1. Draw a circle using the Oval Tool (remember to hold down SHIFT when drawing it) and you should come up with a very neat circle below:


2. Add a Radial Gradient to the circle. You should have something like this:


3. Now, adjust it by moving the center of gradiated area between the middle and the bottom of the circle. To do this, click the Gradient Tool in the tool bar and a white metre should appear accross the circle. Click and drag the black dot in the middle of the circle downwards. (make sure you click on another tool to avoid moving the gradient elsewhere. If that happens, just undo it by pressing CTRL-Z) It should look like this now:


4. This metre is used to change the effect of the gradient. We want to change the colours of the gradient. The arrows pointing at the dots are the current colours used in the gradient. (White and Black) Double-click both arrows and change the colours (White > Yellow. Black > Orange.)
Both the circle and the metre shold look like this now:

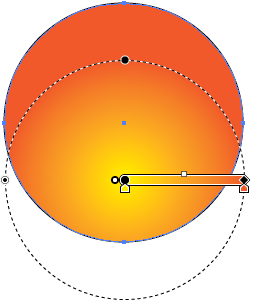
5. Now we need to expand the gradient. When your cursor is not hovering over the metre, there shold be a small square at the end. (where the Orange colour is) Drag it across to expand the gradient:


6. The yellow part of the gradient needs to be bigger. (or brighter) Go into the gradient options on the right-hand side of the screen and click in the yellow arrow, then click on Location and increase the percentage by 27.5%. 


The Circle should now look like this:


7. Now we need to add a contrast. (shadow, thumbnail, whatever) select the Oval tool and draw another circle (oval) and drag it over the circle. (The oval needs to have a linear gradient) You should have this now:

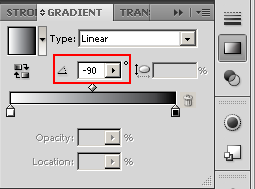
8: You need to have the white at the top and the black at the bottom. In the Gradient options, change the angle of the gradient by -90 degrees.
It should look like this now:

9. Next, we need to turn it into a proper highlight. Go into the Gradient options and change the black area into white, so now that both sides of the gradient are white. Now, on the same colour, change the opacity to 0. (make it transparant)(You may need to adjust the size of the highlight)

Now it should look like this:

10. Finally, we need to get rid of the black lines. Click on the selection tool (if you're not on it) and select both circles. Then click on "None" in the tool bar, (next to the Colour and Gradient options) and it now should look like this:
And there you have it! You are finished!

Thursday, 20 January 2011

Second Floor... But You Can't Get Out... (Digital Video Essay)

Hello everyone, incase you haven't noticed, this post was done last week. I've just edited it a little bit.

Anyway, this is an essay I had to do for my teacher:

How Designers use Digital Video Technology

How do people use gaming today?
Gaming has changed in a major way in the last 20-30 years. People back then would flick on their consoles (and would have to wait for about 2-3 hours for it to warm up!) and just enjoy a challenging, puzzle game of Tetris. Games back then had low quality sound effects and 16 or 32bit graphics, but were highly addictive in an attempt to get the highest score.

The software for the next generation consoles has had a massive change since the creation of the first console, and not just in playing games.

For example, the Xbox 360s software has, not just better gaming than previous generation consoles, but also grants users to search for games, music and films via ‘Marketplace,’ which is full of all sorts of downloadable content, an Avatar, which is character that you can customise to represent yourself and access to a wide range of social networking, whether it’s through MSN Messenger, (even if the person you are talking to is on a PC) Facebook, Twitter, MySpace or even if it’s a general Xbox Live Party Chat.

Some of the next generation consoles aren’t completely backward compatible. For example, some Xbox games can’t be played on the Xbox 360, but some classical can be downloaded from the Xbox live Marketplace, allowing older players to enjoy the same games they enjoyed playing 20 years ago and will not have to wait 3 hours for the console to warm up.

Gaming has also found its way on to online fan-based storyline videos, known as machinimas (or machine cinemas) which are made by fans of a game who want to create their own storyline with the games set universe. Fan-made machinimas are mainly created by recording a ‘scene’ from a game engine, via multiplayer modes (or any other type of game mode) through a graphics or capture card.

The most well-known fan machinima, which took its name by storm, was Red vs. Blue: The Blood-Gulch Chronicles, based on the phenomenal Halo Franchise.

Ever since the launch day of Halo 3, which had sold over 1 million copies within the first 24 hours and grossed more than $300 million, it had become the main source for creating fan-made machinimas, where players great use of the Forge and Theatre modes. (Forge is a map-editing feature that allows players to re-create already made maps in new ways and can play them with friends online Theatre is a video player where users can replay the game play footage from previous games played in first and third person perspectives, including free-roaming) From this method, the players would then upload their recorded videos using the graphics or capture card and several iconic machinima series were created, such as Spriggs, Matchmaking, Outpost Isle and Arby n’ the Chef.

How do people use digital video today?
People use digital video for all sorts of different reasons: Some people use it for recreational uses, such as going out to parties or going out for a holiday with friends and/or family. These days, people use digital video to get themselves noticed, in a sense, telling the world “Hello world! I exist!”

10 years ago, getting a video out into the world have cost £1000s cite refand would have to go to a company to get it out. On top of that, recording a video would have had a camera crew of about 3-5 people, working on different tasks, such as a camera man, sound capturing, etc.

Nowadays, millions of people can just go out and record a video on their digital camera (or a recording digital camera on a phone or some other device) and upload it onto video hosting websites, mainly YouTube, for free. There are even programs, such as Windows Movie Make or Adobe Premiere that can edit them. Once the videos are uploaded onto YouTube, anyone can go on and watch, rate and comment about it. There are roughly over 300 million accounts on YouTube, with over 200,000 videos uploaded per day

Uploading videos on to YouTube today is fairly easy. Some people would go out and record videos on their digital cameras via dvd, tape, memory or SD cards but the majority of YouTube users can record videos and directly upload them from their mobile phones.

The steps for uploading a video from your mobile phone on to YouTube are:
·         Connect you phone or video recording device to the PC.
·         Save your video into your documents
·         Log into YouTube (if you do not have an account yet, click on Register and go through the following process. Otherwise like Login)
·         Click the "Add Video" button that is on the right corner of the page.
·         Select the video file you have save to your documents (YouTube accepts the following file formats: WMV,.AVI,.MOV, M4V, 3GP and.MPG
·         While the video is uploading, it is a good idea put down as many details about your video as possible. Select what kind of category you think your video is, provide the details such as title, tags description etc. With these details users can easily locate your video file in the internet.
·         Uploading time varies depending on the format and file size. Videos will take a couple of minutes if the file is quite small and a hour or more if the file is very big.
·         click "save changes" button when the video is completely uploaded to YouTube.


A few years back, China had an earthquake but due to their governments’ policy, they weren’t allowed to have a TV crew out to record and broadcast the event. Despite this, fewer than 100 people of China, who were there when the earthquake struck, recorded its destruction on mobile devices, such as a camcorder or a mobile phone. The videos were then uploaded onto YouTube and the people of the world were watching.

The way we store videos has also changed: around 20 years ago cite refwhenever a programme was on, anyone could use a video cassette recorder to record anything on TV while they were out, although these methods weren’t always reliable as you would have to record the same throughout the programme lasted. This would sometimes lead to running out of tape in the video cassette, the power maybe cut for unknown reasons or just simple human errors. Recording programmes on to VCR can also loose quality, such as sound and picture.

Today, most videos are either stored via a DVD or as digital copies on a PC, which can also be recorded in the same way as VCR videos and share similar errors. Where VCR videos are recorded and stored using tapes, DVDs are recorded by ‘burning’ a copy of the recorded programmes by using burn laser and are stored as 0s and 1s. Some company filmed DVDs now may contain a digital copy and can let you put it onto an iPod or iPhone.

Friday, 14 January 2011

Joseph Has Water? (Vectors and Bitmaps Essay)

Hello and welcome my fellow Badger Enthusiasts! Today, I'm here to show you a small essay based on...

Vectors and Bitmaps

Vectors and Bitmaps are two types of image files used on a PC but both use different techniques for creating graphics.

This document will explain what these techniques are and what they do:

Bitmaps

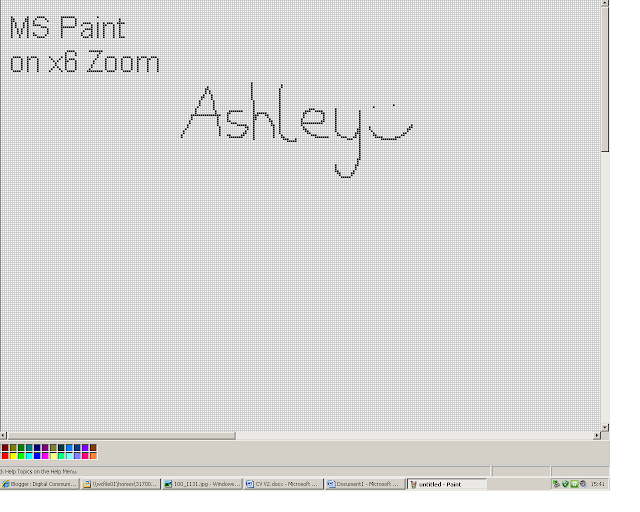
Bitmaps or Bitmap images are comprised of very small single points or dots on a screen called pixels:

This Print Screen from MS Paint above shows whereabouts the pixels are shown but really, they are very small and maybe hard to see in a normal view. (Take note that the grid within this image doesn’t exist as a real image. It’s just there to help show what they would look like if you could really zoom in a see the pixels)
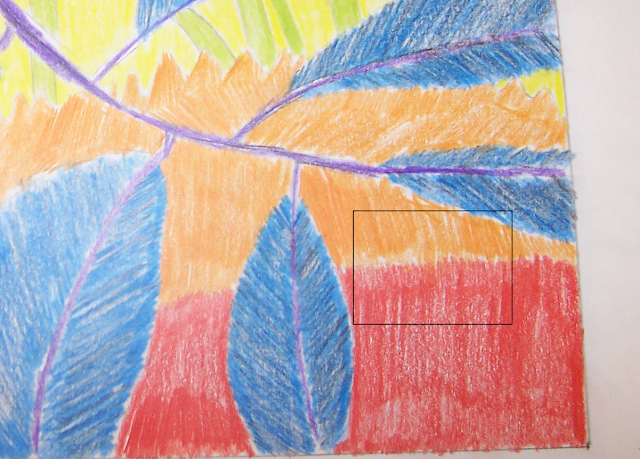
Each Pixel can have a different colour within the RGB colour system in whatever program you are using. Here’s another example of a Bitmap image:
 
You can just about see within the second image the very tiny squares that show the formation of the pixels.


Vectors
There are curtain programmes, such as Adobe Illustrator or Adobe Photoshop that draw images using vectors. Vectors comprise of two or more points joined together on a canvas that can form an image.
When you are drawing with vectors, create something called Control Points. Control Points are small dots that you can use to create lines and can be joined up to create other shapes. The image above is an example of a few lines that have been joined together to create an odd shape. The black lines are the painted lines that you want to draw and the blue highlight or tint is the selection of those lines.

Here is another example of an image created with vector control points:

When it comes to choosing what kind of graphics to use, it’s actually up to you but it’s best to go for a program that works with whatever situation you’re in, that is if you know how to use them.

Here are some advantages of both types:  

Bitmaps
Advantages
·         You can draw free-hand images.
·         Some programmes that use pixels use better effects.
·         Has a more universal choice of file formats to save your work as.
·         Programmes that use pixels are easier to work with.
·         Pixels have individual colour settings and can be manually changed if zoomed in on an area of pixels

Vectors
Advantages
·         Anything you draw using vectors are connected via ‘Paths.’
·         Any shapes made with Vectors can be edited or changed.
·         Graphics made using Vectors would look more appealing, sharper and better quality than graphics made with pixels.
·         You can resize any images that are made with vectors without losing quality.
·         Any image made with Bitmaps can be converted to Vector graphics.

Out of everything that has been mentioned within this essay, I would say personally that Bitmaps are the graphics of choice to work with, mainly because I’ve always used programmes that use Bitmaps and I defiantly find them easiest to work with.

Bibliography

Tuesday, 11 January 2011

Hello, my Window Friends (PhotoShop: Winter Special)

Hello, me again! Have to be honest with you, this Badger Blogger thing is getting a little boring now...

Anyway, more fantastic PhotoShop imagery here for you: This is a painting done by Vincent Van Gogh. I didn't like it that much so I decided to give a nice Wintery Christmas feeling! (I'm just joking, Van Goghs work is whether it's edited or not :) )


U Mad Bro? (Effects in PhotoShop)

Ooo, shiney


Last week, me and my groud were doing some advanced stuff in PhotoShop, some 3Dish typeface.


Here's how mine came out:


It's supposed to be bigger than this but it'll take up a load of space :/

Thursday, 6 January 2011

There is only one me... And that is ME! (My Flash Animation)

Hello everyone. The Badger Blogger is back, this time with a sprite animation I did in my spare time.

Before you watch this, just so you know, the animation is based off of a Sonic the Hedgehog fan character I made a while back (although, this character has been recently edited)

I tried to do some editing in Adobe Premiere Pro but it wasn't working properly, so this video has been uploaded directly from my iPhone.

Anyway, enjoy!